
Over the last couple days, I’ve answered a lot of young writers’ questions about how submission guidelines work both for Wild Blue Wonder Press, and at my day job at the Author Conservatory (where we do critiques as well as put together anthologies, necessitating submission guidelines).
And one of the biggest questions is about formatting manuscripts. And I forget, as someone who has been working in publishing for so long (since January 2016!), that not all of this is super intuitive.
But this is information EVERY writer needs to know, whether indie or traditional. If you’re an indie author, a lot of editors have similar submission guidelines and doing this work will make it easier on any interior formatter/typesetter you work with. If you’re working with any kind of traditional publisher or small press, they will probably have some kind of guidelines for submitting your story.
The Basics
Align/Alignment
Text alignment is a paragraph formatting attribute that determines the appearance of the text in a whole paragraph. For example, in a paragraph that is left-aligned, text is aligned with the left margin. In a paragraph that is justified, text is aligned with both margins. You can also do center alignment for headers.
Most of the time, you use either left-aligned or justified text for publishing. I personally prefer justified.
Fonts
Most of us know what fonts are! Times New Roman is the default font for book publishing at the moment, though some publishers require different fonts.
Indent
Indent usually refers the first line of a paragraph being indented.
One important thing to note: do NOT use the tab key to indent! It takes time to learn, especially if you grew up using tab, but unlearn it. Instead, use your word processor’s tools to indent your story.
How do you indent? Find out how to do that on Google Docs and Microsoft Word.
Most publishers ask for a 0.5″ indent.
Page Breaks
Page breaks are useful if your story has chapters. They are a uniform and controlled way to make sure your next chapter starts on a new page and doesn’t get messed up.
On a desktop, with Google Docs, you can usually create page breaks by holding down the “Control” key and then pressing the “Enter” key. You can also do this by going to Insert > Break > Page Break.
Page Size
What it sounds like! The standard is 8.5″x11″.
Point Size
Point size refers to the height of the font. 11 or 12 point font is the most common size.
Line Spacing
Line spacing is the distance between lines of text. Double spacing or 1.5 spacing at the most common types in manuscript formatting. These can all again be controlled through various tools, usually under the Format windows.
A Note on Intuitive Learning
As a writer, the most vital thing you can learn, especially if you plan to indie publish, is to learn for yourself.
In the next section, I’ll be breaking down how formatting works with Google Docs, but you can apply the same terms to Microsoft Word or any other word processor.
Use Google and your mind to make it happen. It’s as simple as that.
That said, I will note that for me, a lot of the Word formatting tools are under “Home” or “Layout.”
Breaking Down Our Guidelines
For Wild Blue Wonder Press, our submission guidelines are as such.
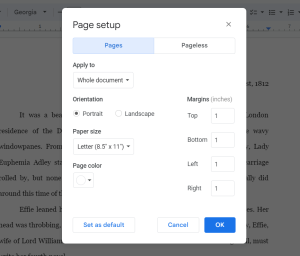
- Standard 8.5″x11″ pages.
This is the default on most Word processors, so you probably won’t have to do anything about this.
On Google Docs, you can adjust page side under File > Page Setup.
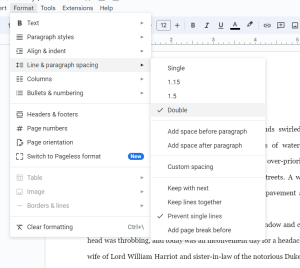
- Times New Roman font, 12 point, body text justified, double spacing.
All of these can be adjusted in the main toolbar or under Format > Line & paragraph spacing.
- Use a 0.5″ indent rather than tabs for paragraphs. Center align any chapter headings.
Center-aligning any chapter headings is pretty intuitive on most word processors. On Google Docs, it’s in the main tool bar and under “Format.”
Indents are a little less intuitive. On Google Docs, there are two different ways to change indents.
1: Under “Format” > “Align & Indent” > “Indentation Options” > Special Indent (first line 0.5), or
2: By sliding the blue bars.
See a video on how to do either of these here.
- Divide scenes with three asterisks (***), center aligned (no indents).
This is pretty intuitive. Center align your scene dividers and make sure they’re not indented!
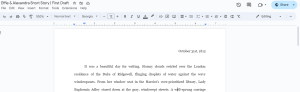
- If your story has chapters, use the “header” function at 30 point font and have each start on a new page. Please format them as “Chapter One,” “Chapter Two,” etc.
Also pretty intuitive. Both Google Docs and Microsoft Word have header function options. On the tool bar in Google Docs, you can see an option that normal reads “normal text.” If you click on this, it will give you a number of header options. Once you make the chapter title a header, you can then adjust font size and type without removing the header designation.
To make each chapter start on a new page, I recommend using page breaks. On a desktop, you can usually create page breaks by holding down the “Control” key and then pressing the “Enter” key. You can also do this by going to Insert > Break > Page Break.
- No headers or footers.
What it says. Don’t add unnecessary headers or footers.
- Label document/save document “name” as “Author Name – Story Title.”
For instance, if your author name is Kellyn Roth and your story title is The Ghost of Ghostlyville, you’d set the document name t0 “Kellyn Roth – The Ghost of Ghostlyville.”
Anyways, this is a short little post, but I thought it could be helpful to all you folks who work in publishing!
What formatting woes do you have when it comes to basic manuscript preparation? It sure is a lot to do!
5 Responses
It’s helpful I believe, thanks! But for me personally I have trouble figuring it all out. It may take me a while. 🙂
Makes sense!
Hang in there, Serenity! It takes time to get comfortable with formatting, but I know you can do it!
Thanks for this post! Very helpful. 🙂
Just a quick question, is there a certain size the ‘Chapter One, Chapter Two’ should be?
Yup! The submission guidelines page has all that information.